

A few of weeks ago, I took some pictures of blossoms in our beautiful Niagara region. My DD lives just outside of the city, and on the street to get to her place are many orchards. During blossom season, the trees are just exploding with colour! Every day just gets more beautiful, until they reach their peak, and before you know it, it's all over!
I took some time to slow down, stop at the side of the road, and take pictures! I made sure to take my camera's manual with me, because I knew I would want to play with exposure and aperture. I still have a lot to learn about photography, but the best way to learn is to do it!
I still don't know what kind of trees I was taking pictures of! I did know they were pretty, and I wanted to capture that. I also wanted to create a fine art print, using some the of the new textures I've designed.
3 Easy steps to go from commonplace to compelling:
1. The first step is to open your photo in photoshop, or photoshop elements. Make sure that you do all of the editing, cropping, and adjustments that you want to do at this stage.
2. The next step is to add the texture layer. There are always several ways to accomplish anything you want to do in photoshop. You could (a) go to "file" and "place" the texture layer, (b) open the texture, drag and drop it onto your photo. Holding down the shift key while doing this will ensure that it will be centred over your photo, (c) open the texture, drag and drop the layer in the layers palette onto the photo, or (d) select the texture, go to "edit" and click "copy", then "paste" it onto the photo. Using keyboard shortcuts is great with this technique.
Once you have the texture layer over the photo layer, you will need to adjust the texture's size to fit over the photo. Go to "edit" and "transform", holding the shift key will keep the aspect ratio when pulling the handles on the corners, or just grab the handles on the sides, and stretch to fit.
3. The next step is to adjust the blend mode and opacity. This is where it gets exiting! My favourite blend modes so far have been, multiply, linear light, overlay, and soft light, when texturing my photos. I have had some success as well with duplicating a texture layer, and choosing 2 different blend modes at different opacities.
Opacity will also make a huge difference in the final outcome. You will most likely need to adjust the opacity so as not to overwhelm the photo.
----------------------------------------------
Experimenting with the blend modes and opacity is fun and exciting. It's great to see how much the mood, colour and lighting are transformed before your eyes as you do this. I usually duplicate the layers I'm working on, try a few different blend modes, and see which layers I like and want to keep, and get rid of the ones that aren't working. Sometimes it's a combination that's works out the best.
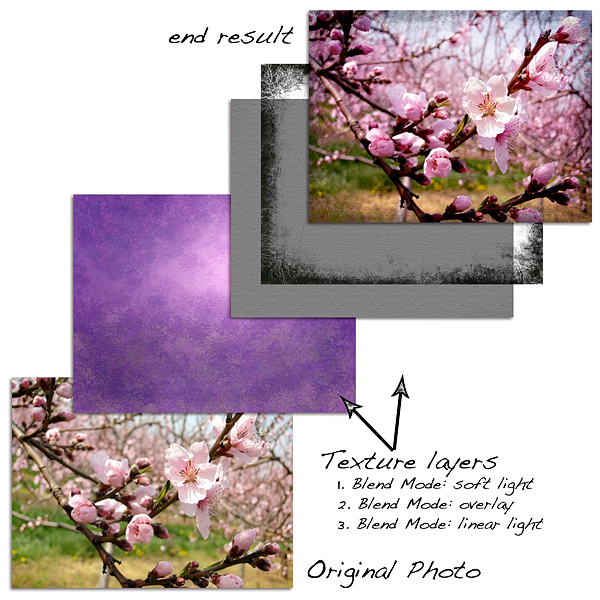
In my example, I used 3 separate layers to make my texture. I used texture layers from my new "Summer Sun Kissed Texture" pack.


The first layer is "lavender mist", which has the blend mode set at soft light, and opacity is at 100%. The second layer is "TexturePlate-painterly", it's blend mode is overlay, and the opacity is at 85%, and the last layer, is "Sun Kissed Edge". The blend mode is linear light, and the opacity is at 40%.


A few more examples:


Thanks for taking the time to stop by, and as always, please feel free to leave a comment, tell me what you think, or share a link to your own textured photos.
Happy Editing!
Marlene
No comments:
Post a Comment