Saturday, November 5, 2011

Happy Digital Scrapbooking Day!

How exciting! A day (weekend) devoted to my favourite hobby, digital scrapbooking. I'll bet there are many, many scrappers who are busy hunting some great finds in digiland this weekend!

I've been busy today coming up with something to give away!


I've also been busy baking cookies for coffee after church tomorrow. We were involved in "we love our neighbour" campaign. Basically, about 2 weeks ago, a bunch of us went around our church neighbourhood, and handed out paper bags, to collect non perishable food for our local food bank, "Community Care". On Halloween night, we picked up the bags, and invited all to come to a special service to celebrate a bountiful harvest. And it was bountiful indeed!
As my DD said "FRC rocks!" It was a great event, and I would say, very successful. On one of the bags was written a nice note: "Thank you for giving up your Halloween night to do this"


Is anyone thinking about their Christmas Cards yet? I've taken one of my favourite birth announcements, and turned it into a Christmas Card template. This will be simple to use, with your photo editing software, (ie, photoshop elements) just pop in your own photo, change the names, and voila, your Christmas Card will be ready to print.


This is a 5x7, but can be scaled down to 4x6, if you prefer.
If anyone wants this in a different format, just leave a comment, I'll do my best to accommodate.
The basics of this template are from another of my favourites, the snow day kit:


And without further delay, here is the link to download the template. (click the link under the picture) This will only be available free for a limited time! After that, you will find it at my Etsy shop.
Freebie has expired.


Monday, July 4, 2011

My Trip down Memory Lane: How I Became an Artist

I can't remember a time that I didn't love art, or want to be an artist. From a very young age, It was my dream to create, to be an artist. I was influenced the most by my one of my uncles, who's art I have always admired, a painter extroardinaire! Many in my family have dabbled in painting, my grandfather, uncles, and an aunt. We are also a very "crafty" family. My grandmother's skill with needlework and sewing was bred from necessity, but became one of her most loved activities. My mom can knit faster than anyone I know, she's almost as fast as a machine! Many of us women have done crosstitch, embroidery, knitting, crocheting, even tatting. Paper crafts too, scrapbooking, card making, journaling... the list goes on and on.

I think it was natural for me to get involved in Art and Craft. Even though my heart's desire as a child was to paint, I ended up in fine craft. That's a story in itself. While in high school, my parents were just starting out in their new business. They began importing and distributing various goods from The Netherlands, their former homeland. Some of the goods was jewellery. Dad had some connections there, and a promise from someone at the company that I could get a job designing jewellery, but I would need an education in jewellery design first. So, the next step, apply to a college that has a course in jewellery design. My guidance counselor suggested Sheridan College, School of Crafts and Design. It was relatively local, about an hours drive, in Mississauga, Ontario. One of my uncles commuted daily to Toronto, and it was decided at the time that I would continue to live at home, and get a ride with him, should I be accepted at Sheridan.

I didn't doubt for a second I would get in. I didn't apply anywhere else. My art teacher in high school helped me put a portfolio together, which by today's standards would be laughable, however, it was good enough to "get me in". Sheridan's standards today are very high, and it's difficult to get accepted now. They are world renowned, particularly in the animation dept. Many of Sheridan's graduates are now employed at Pixar and Disney.

This was happening in the late 70's, when craft was getting quite the revival, and even a new lease on life, so to speak.

Some of my old high school art, these were part of my application to get into Sheridan:


 my little brother! I ended up using this design on a T shirt for him, and then later gave him a copy of the drawing. 


A funny story; I have to recall one of my English teachers in high school. He made us write a 1 page essay every week, many of us complained bitterly. His reasoning; he wanted us to be more, have more, do more. Be Better! He continually told us if we didn't learn to write, we'd end up as "basket weavers" from Bangladesh! How we'd be from Bangladesh, I'll never know, for we were all Canadian, through and through. I remember walking around the campus at Sheridan at an Open House, and there were some highly respected "basket weavers" giving workshops to a very interested audience! I think I laughed out loud when I saw that. Here I was, associated with "basket weavers", and it was "OK", even better than OK.

I do understand what he meant, that education is the key to success in this world, and he didn't mean that being a craftsperson in and of itself was a bad thing... but it sure was humorous!
When I joined the Sheridan family, my family was busy getting their souvenir business off the ground. Part of my duties then was to prepare the artwork. It was tedious, painstaking, work. I'd get it done in about 2 minutes now with a computer, but back in the day, it took me well over 2 hours for each one.
You see, my Dad, the entrepreneur, was importing and distributing souvenir spoons. They'd been a big thing in Europe, and was just getting big in N America. It was quite a process, and eventually, they did much of the manufacturing themselves. It started out as a home business, graduated to having an offsite building, and a bunch of employees.

The spoons themselves had a little, plasticized photo on it, usually of a some kind of attraction, like a picture of Niagara Falls, for instance. My job was to put the lettering on top, and make sure that the shape of the photo would eventually fit into the shield shape of the little pictures. There was also some photography involved, and with computers, this too has become obsolete! My classmates, and even my teachers, often be-littled my involvement with this enterprise. But goodness!, it's how my parents were able to pay my tuition!
Those first self-taught dabblings in graphic design turned out to be a foundation for what I'm doing even now!

So, I learned a lot at Sheridan! As it turns out, the basics of good design is quite useful in all kinds of endeavours. I spent 3 years there, and even though I had sorta planned to go to Holland, for that design job, those plans quickly changed... my high school sweetheart, and the love of my life, asked me to marry him. (also to my classmates scorn!), and a new path for my life was set!

I did become quite pleased with designing and making one of a kind jewellery, and it was my focus for many years. I did a lot of craft shows, had my work shown in some galleries, and sold to the retail market as well.

We were raising our family all the while, and I quickly discovered that teenagers need their mom around more, rather than less often, and the craft show sales were declining, and so, I gave it up. I didn't think it would be for very long, but I have not really picked it up again, and I can honestly say I don't really miss it!

I've dabbled in all kinds of other creative outlets, but that's another story.

Thanks for stopping by,
Happy Scrapping!
Marlene.

Friday, June 17, 2011

Happy Father's Day!

Happy Father's Day! It's time celebrate all that Dad's are! And I have the best Dad ever!
He's just turned 83 years young. I've been working on his Memoirs, scrapping them digitally, so as to put a slide show together for him. The process is long, and seems to take forever, but it's a labour of love, to be sure, and through it all, I have certainly gained so much more knowledge of who he is and the life he's lived, had I not taken on this project!

We've heard the stories all of our lives, but there is something so special about getting it all down on paper, and supported with photographs. The project will end up as a multimedia presentation, with sound, and visuals. He's still working on it all, with every new big event in his life getting documented. He's saved so many old documents, passports, papers, birth and death announcements, and family history, it's mind boggling.

He keeps bugging me about getting his books back, but I've barely scratched the surface of this huge project! I need to seriously get going on it! I had hoped that I would have something for him as a gift for Father's Day, not sure what I'm going to do. Maybe a sneak peak??
Here are a few of the layouts I've done:


The thing is, Dad has Age Related Macular Degeneration. This is what got me started to begin with, he can't even see the stuff he's putting into his books without the help of his reading machine! He can, however, see the large screen TV, if he sits real close, and sits at an angle to it. People with Macular Degeneration usually retain some peripheral vision, the centre of the their vision is what's been impaired. So, I decided to put his pictures onto a Dvd, to be viewed on the TV. And of course, I can't just do things simply, being an artist, and creative person, I have to put my stamp on it, and I want it to be special for my Dad, 'cause he's special!

This picture is of a much newer type, but similar in design, they are kind of like the old microfiche machines we used to use in the library. Do they even still have them?


Dad was always the one you went to if you wanted something, 'cause Mom just said no anyway. At least that's how it seemed as a child! But my Dad has always had a very long fuse, he's slow to get impatient, and angry, and has a great sense of humour! But boy oh boy, watch out if he gets to end of that fuse, 'cause a big kaboom is waiting at the end of it! Thankfully, there's not been many of those, and it was usually our own fault anyway!

Dad loves the Lord, loves his family, Mom, his kids, grand kids, and now 3 great grand kids! And we have large extended families too. It's a crazy loud bunch when we all get together, a bit overwhelming if you first come onto the scene!

They have a great house for visiting, and love to garden, and take excellent care of everything.
They've made a point to make their house a home, and one that all feel welcome to enter. They've never taken the "spiritual gifts" test, but I am 100% positive that both my mom and dad have the gift of hospitality! Everyone is made to feel as welcome as possible.

They've also taken care to make it very kid friendly, (not kid proof, mind you! kids have to learn what they can can't touch!!), having a basement that has video games, board games and lots of stuff to do, a backyard that rivals any resort, with a large heated swimming pool, a hot tub, gazebo and lovely deck. My kids never complained about going to visit, as a matter of fact, it was a good one to use as a consequence for undesirable behaviour: Watch out, or you won't be going swimming, playing video games....

We're spending Father's Day at my brother's place this year, as he's singing (my brother, Dad can't carry a tune in a bucket, seems that's where I get my own singing ability from!) with the "Nylons" on Sunday at a Barbershop show. A little different, as Mom and Dad usually do all the hosting of parties. I think they deserve a break! It should be fun!

They have had company from Holland, and more to come next week! They love it, but it's tiring none the less! My Parent's gift of hospitality will be stretched once again this summer! My Mom and Dad's gracious gift is gladly shared, but I do worry how tired they get. Dad's 83, Mom's going to be 75 this year, but still their stamina puts me to shame!! I hope I'll be able to keep up! I'm looking forward to spending some time with my Dad's family, getting some great photos, then scrapping them!!

Thanks for stopping by,
Happy scrapping to all, and especially, a very Happy Father's Day to all the great dad's,
And to my Dad: I love you lots, you're the best Dad ever!

Marlene.

Monday, June 6, 2011

Texture plates and digital scrapbooking paper:

Textures aren't just for changing the look of a photograph! You can also use textures to change the look of your digital scrapbooking paper.

I have just completed a new set of texture plates that resemble different fabrics and fabric patterns.


These are great to use in layouts and paper that you'd want to look like its been printed on various types of fabric! In the following example, I've used the texture "herringbone-distressed", with a blend mode set to "overlay". The 'before' looks like paper, the after looks more like fabric:

Original "paper" +
Texture Plate "herringbone-distressed" =

"After", digital "paper" now has a fabric look to it!

In this example, I've used paper from an add-on freebie from an earlier post, you can get it here.
I used the texture plate twice on this paper,  set at "overlay" and "soft light" blending modes. Doing this has given this paper more of that textured look. Since the texture itself has some distressing added, this transfers to the paper as well.


Original "paper" +
Texture Plate "Cotton distressed" =


 "After", digital scrapbooking paper that now looks more like fabric!

Thanks for dropping by,
Happy Scrapping!

Marlene

Friday, June 3, 2011

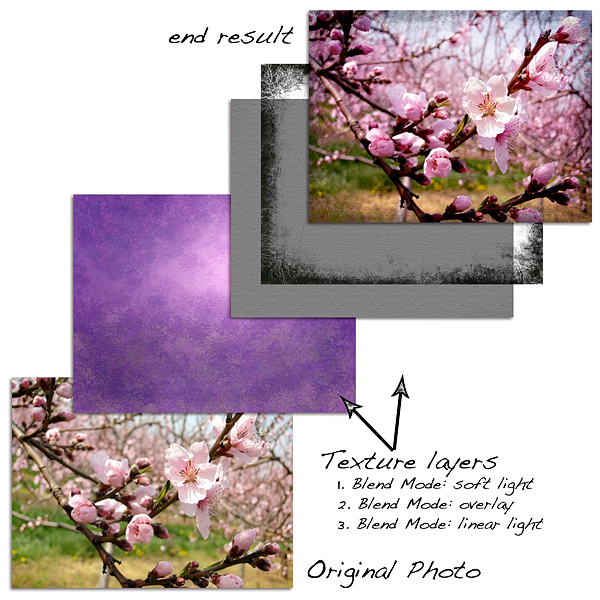
Using textures in photography, 3 easy steps to take your photo from commonplace to compelling.


A few of weeks ago, I took some pictures of blossoms in our beautiful Niagara region. My DD lives just outside of the city, and on the street to get to her place are many orchards. During blossom season, the trees are just exploding with colour! Every day just gets more beautiful, until they reach their peak, and before you know it, it's all over!
I took some time to slow down, stop at the side of the road, and take pictures! I made sure to take my camera's manual with me, because I knew I would want to play with exposure and aperture. I still have a lot to learn about photography, but the best way to learn is to do it!

I still don't know what kind of trees I was taking pictures of! I did know they were pretty, and I wanted to capture that. I also wanted to create a fine art print, using some the of the new textures I've designed.


3 Easy steps to go from commonplace to compelling:
     1. The first step is to open your photo in photoshop, or photoshop elements. Make sure that you do all of the editing, cropping, and adjustments that you want to do at this stage.
     2.  The next step is to add the texture layer. There are always several ways to accomplish anything you want to do in photoshop. You could (a) go to "file" and "place" the texture layer, (b) open the texture, drag and drop it onto your photo. Holding down the shift key while doing this will ensure that it will be centred over your photo, (c) open the texture, drag and drop the layer in the layers palette onto the photo, or (d) select the texture, go to "edit" and click "copy", then "paste" it onto the photo. Using keyboard shortcuts is great with this technique.
Once you have the texture layer over the photo layer, you will need to adjust the texture's size to fit over the photo. Go to "edit" and "transform", holding the shift key will keep the aspect ratio when pulling the handles on the corners, or just grab the handles on the sides, and stretch to fit.
     3. The next step is to adjust the blend mode and opacity. This is where it gets exiting! My favourite blend modes so far have been, multiply, linear light, overlay, and soft light, when texturing my photos. I have had some success as well with duplicating a texture layer, and choosing 2 different blend modes at different opacities.
Opacity will also make a huge difference in the final outcome. You will most likely need to adjust the opacity so as not to overwhelm the photo.


----------------------------------------------

Experimenting with the blend modes and opacity is fun and exciting. It's great to see how much the mood, colour and lighting are transformed before your eyes as you do this. I usually duplicate the layers I'm working on, try a few different blend modes, and see which layers I like and want to keep, and get rid of the ones that aren't working. Sometimes it's a combination that's works out the best.
In my example, I used 3 separate layers to make my texture. I used texture layers from my new "Summer Sun Kissed Texture" pack.


The first layer is "lavender mist", which has the blend mode set at soft light, and opacity is at 100%. The second layer is "TexturePlate-painterly", it's blend mode is overlay, and the opacity is at 85%, and the last layer, is "Sun Kissed Edge". The blend mode is linear light, and the opacity is at 40%.


A few more examples:


Thanks for taking the time to stop by, and as always, please feel free to leave a comment, tell me what you think, or share a link to your own textured photos.
Happy Editing!
Marlene

Friday, May 20, 2011

Freebie Friday! Textures for Photographers and Digital Scrapbookers

The sun is shining again, and the promise of summer is right around the corner. That puts me in a good mood, how about you? I have continued working on some more textures, and I decided to share a small sample of these newest creations with all of  you.


These are 12 x 12, 300 dpi jpg's. They can be used as digital paper, or overlays in scrabooking layouts, or photographers can use them to texture their photos. See the previous blog entry for more info about texturing photos.

If you download, please be kind, leave a comment. Designers work hard to bring you freebies, we really appreciate getting some feedback.

Please feel free to link to your layouts, or photos!! I'd love to see your creations!!

Happy Scrapping and editing!
Marlene

Thursday, May 19, 2011

Learning about Texturing Photos and Digital Scrapbooking Layouts

I came across a fantastic article recently, which explained a lot about textures in photography, how, when and why to use them.

I've always love texture, in whatever medium I've been using, from my metal and jewellery days, to now when designing digital scrapbooking papers.

What I've learned so far, (and I've got much more to learn) is that textures aren't there to fix bad photos. Garbage in, garbage out!

It does add interest, changes the mood and lighting, can enhance or change the style of the photograph or digital scrapbooking layout.


So... I've been having some fun designing some textures, and experimenting with some of my own photos and layouts. (I will be putting together a package of them and they will be available at my Esty shop)

here are some Before and After photos:

This first set, I broke my first rule, I don't think this is a great photo to begin with, but I was anxious to try out some of my new textures! Once I got started, I just kept going! I like the results, though, and that's what matters!

Before:
After:

 I cropped the photo, then used 2 layers of "bokeh" texture, and 2 layers of "paint" texture plates.

I used a gausian blur on the 2 bokeh texture layers, one had the blending mode set to "multiply" and the other to "soft light" On the bokeh layers, and on one of the paint layers, I brushed out the cactus flower, and also used different blending modes.

I also used an action from Pure Photoshop Actions: Pure pink, which boosted the colour a bit more. They have some great actions! They are subtle, but still pack a punch!

These are the textures I designed and used in the above example:


The key is working with layers, blending modes, opacity, and even filters, to achieve the look you want, (or sometimes you get happy accidents)!

Here are more Before and Afters:
Before:


After:


After again, adding a border:


This photo was taken at the Port Dalhousie pier. I like the way the texture has changed the colouring on this photo. Although the original photo does have a nice quality to it, I believe that the texture has made a difference in the mood of this photo. It's gone from slightly ethereal to rugged to painterly.

The last one was processed with a "paint" texture plate, and 2 versions of the texture below, one layers blending mode set to overlay, and the purple one set to multiply.
I brushed out the rocks on this one as well.


Here is another example,
Before:


After:


I did a series of Valentines day cards for my Hubby and the kids. I'm not partial to pink, so this was my answer to making cards for them, with out all the girly pink!
The texture layer is green, with a bit of brown. I set the blending mode to overlay, and brushed out the area over the photo. I like both looks, but the texture definitely adds some interest to the layout.

Before:

 After:


This is a layout from my dad's memoirs that I've been working on for a long time. Have a look here to see more of these layouts.
This one looks great after the texture has been added. It adds a sepia colour to it, and the crackled texture also ages the layout, and tones down the contrast, which is quite suitable for a heritage layout.

This is a learning process, to be sure, and I know I'm not there yet, but this sure is a lot of fun!

Here's the link to that fantastic article:


Thanks for stopping by!
Please feel free to share a link to your photos or layouts that you've incorporated some textures in!
Or, just share your thoughts.
Happy Scrapping, and Happy editing!
Marlene