Showing posts with label Adobe photoshop Elements. Show all posts

Saturday, November 5, 2011

Happy Digital Scrapbooking Day!

How exciting! A day (weekend) devoted to my favourite hobby, digital scrapbooking. I'll bet there are many, many scrappers who are busy hunting some great finds in digiland this weekend!

I've been busy today coming up with something to give away!


I've also been busy baking cookies for coffee after church tomorrow. We were involved in "we love our neighbour" campaign. Basically, about 2 weeks ago, a bunch of us went around our church neighbourhood, and handed out paper bags, to collect non perishable food for our local food bank, "Community Care". On Halloween night, we picked up the bags, and invited all to come to a special service to celebrate a bountiful harvest. And it was bountiful indeed!
As my DD said "FRC rocks!" It was a great event, and I would say, very successful. On one of the bags was written a nice note: "Thank you for giving up your Halloween night to do this"


Is anyone thinking about their Christmas Cards yet? I've taken one of my favourite birth announcements, and turned it into a Christmas Card template. This will be simple to use, with your photo editing software, (ie, photoshop elements) just pop in your own photo, change the names, and voila, your Christmas Card will be ready to print.


This is a 5x7, but can be scaled down to 4x6, if you prefer.
If anyone wants this in a different format, just leave a comment, I'll do my best to accommodate.
The basics of this template are from another of my favourites, the snow day kit:


And without further delay, here is the link to download the template. (click the link under the picture) This will only be available free for a limited time! After that, you will find it at my Etsy shop.
Freebie has expired.


Monday, June 6, 2011

Texture plates and digital scrapbooking paper:

Textures aren't just for changing the look of a photograph! You can also use textures to change the look of your digital scrapbooking paper.

I have just completed a new set of texture plates that resemble different fabrics and fabric patterns.


These are great to use in layouts and paper that you'd want to look like its been printed on various types of fabric! In the following example, I've used the texture "herringbone-distressed", with a blend mode set to "overlay". The 'before' looks like paper, the after looks more like fabric:

Original "paper" +
Texture Plate "herringbone-distressed" =

"After", digital "paper" now has a fabric look to it!

In this example, I've used paper from an add-on freebie from an earlier post, you can get it here.
I used the texture plate twice on this paper,  set at "overlay" and "soft light" blending modes. Doing this has given this paper more of that textured look. Since the texture itself has some distressing added, this transfers to the paper as well.


Original "paper" +
Texture Plate "Cotton distressed" =


 "After", digital scrapbooking paper that now looks more like fabric!

Thanks for dropping by,
Happy Scrapping!

Marlene

Friday, June 3, 2011

Using textures in photography, 3 easy steps to take your photo from commonplace to compelling.


A few of weeks ago, I took some pictures of blossoms in our beautiful Niagara region. My DD lives just outside of the city, and on the street to get to her place are many orchards. During blossom season, the trees are just exploding with colour! Every day just gets more beautiful, until they reach their peak, and before you know it, it's all over!
I took some time to slow down, stop at the side of the road, and take pictures! I made sure to take my camera's manual with me, because I knew I would want to play with exposure and aperture. I still have a lot to learn about photography, but the best way to learn is to do it!

I still don't know what kind of trees I was taking pictures of! I did know they were pretty, and I wanted to capture that. I also wanted to create a fine art print, using some the of the new textures I've designed.


3 Easy steps to go from commonplace to compelling:
     1. The first step is to open your photo in photoshop, or photoshop elements. Make sure that you do all of the editing, cropping, and adjustments that you want to do at this stage.
     2.  The next step is to add the texture layer. There are always several ways to accomplish anything you want to do in photoshop. You could (a) go to "file" and "place" the texture layer, (b) open the texture, drag and drop it onto your photo. Holding down the shift key while doing this will ensure that it will be centred over your photo, (c) open the texture, drag and drop the layer in the layers palette onto the photo, or (d) select the texture, go to "edit" and click "copy", then "paste" it onto the photo. Using keyboard shortcuts is great with this technique.
Once you have the texture layer over the photo layer, you will need to adjust the texture's size to fit over the photo. Go to "edit" and "transform", holding the shift key will keep the aspect ratio when pulling the handles on the corners, or just grab the handles on the sides, and stretch to fit.
     3. The next step is to adjust the blend mode and opacity. This is where it gets exiting! My favourite blend modes so far have been, multiply, linear light, overlay, and soft light, when texturing my photos. I have had some success as well with duplicating a texture layer, and choosing 2 different blend modes at different opacities.
Opacity will also make a huge difference in the final outcome. You will most likely need to adjust the opacity so as not to overwhelm the photo.


----------------------------------------------

Experimenting with the blend modes and opacity is fun and exciting. It's great to see how much the mood, colour and lighting are transformed before your eyes as you do this. I usually duplicate the layers I'm working on, try a few different blend modes, and see which layers I like and want to keep, and get rid of the ones that aren't working. Sometimes it's a combination that's works out the best.
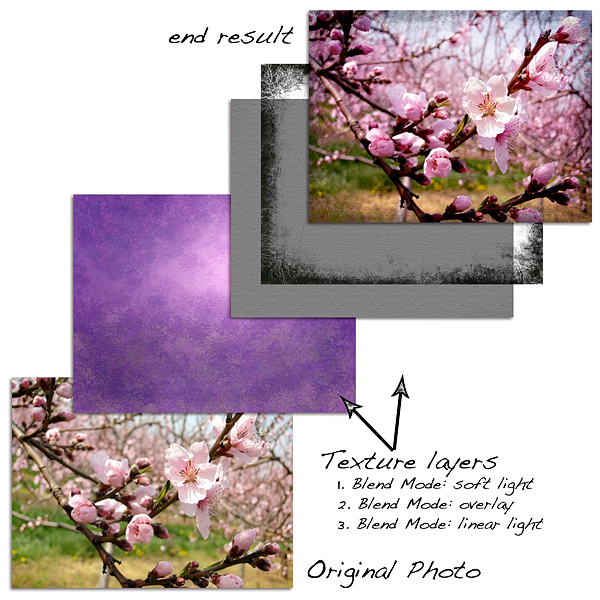
In my example, I used 3 separate layers to make my texture. I used texture layers from my new "Summer Sun Kissed Texture" pack.


The first layer is "lavender mist", which has the blend mode set at soft light, and opacity is at 100%. The second layer is "TexturePlate-painterly", it's blend mode is overlay, and the opacity is at 85%, and the last layer, is "Sun Kissed Edge". The blend mode is linear light, and the opacity is at 40%.


A few more examples:


Thanks for taking the time to stop by, and as always, please feel free to leave a comment, tell me what you think, or share a link to your own textured photos.
Happy Editing!
Marlene

Friday, March 18, 2011

A give-away and a freebie

Memory Lane Digital, my facebook page, is featured in a give-away, starting today!
To get a chance to win a whole lot, around $1000.00 worth, of photography related stuff, go to the Tiny Feet Photography facebook page here
Or  Tiny Feet Blog
I'm giving away a digital birth announcement I just designed.


If you want to try digital scrapbooking, getting a bunch of freebies is a great way to start!

My inspiration for starting in digital scrapbooking came about in a round about way, as I was looking for a better way to put together a layout for a slideshow. I came across Memory Mixer, which was reviewed by top 10 reviews. (gold award in 2009) Have a look here
I decided to purchase this software, and it kind of took off from there.

There are a lot of "freebies" out there, I have some links on this blog to a few of my favourite sites, and some do offer great freebies.

If you don't want to spend money on software, if you are unsure if this is right for you, there are some great options there too.

1. first of all, you could use "gimp", which is an open source software, with many of the same features as photoshop, but completely free! Gimp

2. Photoshop Elements has a free trial, good for 30 days Elements

3. Story Book Creator, from Creative Memories, also has a free trial: StoryBook

The best thing about these, are they are compatible with both Mac's and Pc's. That's great for me, cause I have a mac, which I love! I don't think I will ever go back to using a PC! ...I don't do "windows"!! ha ha.

There are many more software options, Photoshop Elements seems to be the most widely used, and the most serious digital scrapbookers go for Adobe Photoshop CS5 (or 4, 3...)
Photoshop Elements is much more economical, and powerful enough for just about everyone.
I would think that there are a lot of people using Storybook Creator as well. I have not used either one, so I don't know how they compare.
Which is your favourite, or wish you had tried instead?
I'd love to hear any reviews you have.


I've also got a freebie for you to grab, a sample pack of the digital papers I've been working on.